(Updated December 7, 2020)
Before we go any farther, make sure you’re acquainted with the range of a vibraphone:

And if you haven’t read this tidbit in a different vibraphone-related post, be aware that a 4 octave (extended range) vibraphone is very hard to come by, and you may want to be cautious about choosing to use notes in that range.
Pitch-bending:
On a vibraphone, a plastic or rubber mallet can be used to bend the pitch of a bar by moving from one nodal point (near the edge where the rope runs through, and the center) to another. Each bar is able to bend one semitone below its normal pitch by moving toward the center with the bending mallet.
Smoother bending can be achieved with a bow. Bending a pitch that has been struck by a mallet usually requires a slight delay before the bending mallet is used; when a bowed pitch is bent, the bending mallet can be resting on the bar in advance so as to begin the bend immediately without affecting the attack.
Pitch bending is typically used to bend a pitch down, as it’s not possible to bend a key upward. However, it’s entirely possible to start in the middle of the bar and moving to the outer nodal points to create a bend back up to the bar’s normal pitch.
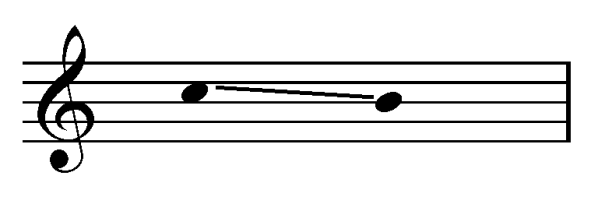
There are 2 basic ways that I’d suggest notating bent pitches. First, there’s a simple gliss indication if you want to specifically hit the semitone.
You can also, of course, use this technique in the reverse, or create a back and forth affect that is achieved by dragging a bending mallet all the way from one edge to the other.


Other times, however, the desired sound is more about the effect of the bend rather than hitting a specific pitch. For this, it’s nice to employ an error indicating the gesture (and clarified in the performance notes).
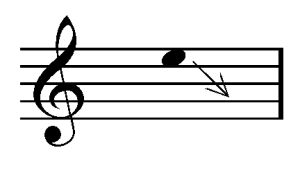
There’s probably a nicer looking arrow somewhere. Oh well.
Keep in mind that a pitch bending mallet is much harder than a typical yarn vibraphone mallet. Because of this, a 4-voice chord is probably not ideal. Also be aware of what position you’d like the bending mallet to be in, as this can create complications. For example, if you find yourself wanting to bend a very high note followed by bending a very low note, some athletic crossing-over might be required (or, you may be able to employ 2 bending mallets).
A note on duration
The pitch bend is not very forgiving in terms of how long it will last. Move the mallet too slowly, and it will simply mute the sound entirely. Because of this, a general rule is that the bars with the greatest distance (the lowest notes) can be bent for the longest time, while the smallest/highest notes can offer only a fleeting effect. So in the case of the vibraphone, F3 – E3 can last a few seconds, while F6 – E6 will last only an instant after the bending mallet begins to move.
A note on orchestration
By bending a bar, you are dampening it in the process. Because of this, the dynamic ceiling for a pitch bend is very low and it will be very hard to project through a dense texture.
Recommended Listening
For a very cool example of pitch bending (and other extended techniques that I’ll get to in other posts), check out this video of my good friend Russell Fisher performing Christopher Deane’s Mourning Dove Sonnet:
And a piece that I’m very fond of, Sarah Hennies’s Flourish
\/\/\
Related Posts:
on bowed vibraphone
pitch bending part 2: water
/\/\/
If you enjoyed this and other posts on the blog, please consider supporting my work via Patreon!
